Syma X8 X8C X8HC FPV with RunCam 2 cable
When flying blind with a RunCam 2 slung under my Syma, I wanted to see what I was pointing at when flying rather than guessing. The solution was to send the video back down via a FPV transmitter.
Required parts:
- 3.5mm jack plug or chopped up jack to jack cable
- Solder Micro USB plug (ebay etc)
- Some small lengths of interconnecting wire
- VTX 20mW that can work from 5V
- FPV Goggles to view the transmitted signal
Syma X8 camera socket
The Syma has a 3.5mm jack socket used for the camera module that came with it and in my previous post I explain what the connector pins are.
SYMA X8C X8HC 3.5mm pin out camera control signal
The tip and screen of the connector can provide a five volt supply for a FPV module. I went for the
Eachine VTX03 Super Mini 5.8G 72CH 0/25mW/50mw/200mW Switchable FPV Transmitter as it can run from 5 Volts, is small and easy to work with. I recommend a 25mW transmitter, the Syma does not cope with any higher demand than that on its power rail. The VTX03 is switchable between three power ratings, make certain you read the instructions and set it to 25mW.
Make a Cable 3.5mm & Micro USB
Next you must make a cable to connect the RunCam and drone together. The RunCam outputs video when it is on via its Micro USB connector. The FPV unit needs a 3.5mm Jack to get power from the drone.
So go to the Dollar or Pound shop and get a cheap 3.5mm to 3.5mm cable, used for linking many audio devices together so is easy to find, or chop one off an old pair of headphones.
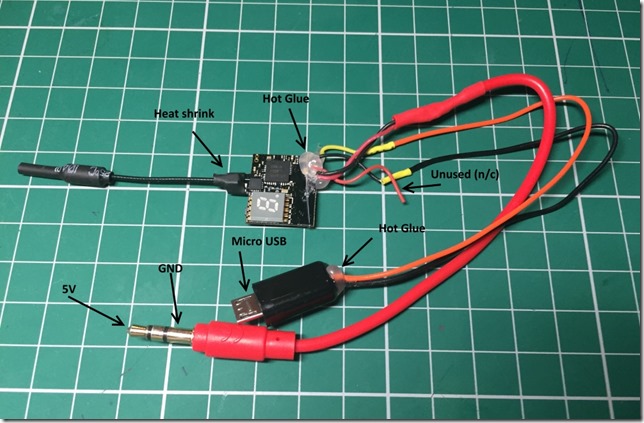
Wire the tip of the connector to the power Red wire of the VTX. Wire the shield (not the ring), to the black wire of the VTX power. You will need to chop off the tiny white connector that comes with the VTX to do this, the power only has two wires, red and black going to the white connector.
To test, plug in the 3.5mm jack plug, making certain it is fully into the drone socket, turn on the drone and the LED should illuminate on the VTX display showing it is getting power.
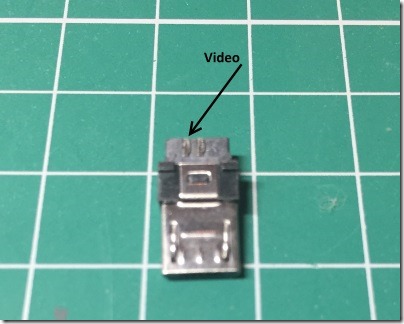
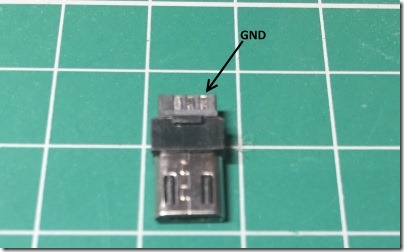
Next unplug it again. Now you will need to use a solder micro USB connector. I had no luck with cutting up Micro USB cables for this, as I don’t think they use the same pins as the RunCam. Wire the yellow wire from the VTX to the Video pin indicated in the photo below. Then wire the GND pin of the micro USB connector to the Video GND pin of the VTX (black). The Video cables are the three wires going to the tiny white connector on the VTX. You will have one wire unused on the VTX of the three.
Hot glue the wires where they attach to the PCB to prevent them bending and thus falling off. Also glue in the cable as required to the rear of the connectors to give it some strain relief. You should also heat shrink the antenna to the PCB to prevent it popping off in flight or on heavy landing.
Plug the Usb into the RunCam, the 3.5mm jack into the drone and turn on the RunCam (it will power from the RunCam battery so make certain it is charged), turn on the drone. You will then be able to see the picture in your FTV goggles! Now secure the VTX module to the jack plug with a cable tie, this is a better solution that taping it a Syma leg, as if the leg comes off during heavy landing, there is a good chance your VTX wiring harness will be snapped too.


